airMAX - How to Connect airMAX M Stations to an airMAX AC Access Point
แหล่งที่มา :
https://help.ubnt.com/hc/en-us/articles/221464608-airMAX-How-to-Connect-airMAX-M-Stations-to-an-airMAX-AC-Access-Point
Overview
Users will learn how to connect airMAX M Stations to an airMAX AC Access Point.
Requirements:
airMAX AC device on airOS 8+
airMAX M device on airOS 6+
Note: airMAX Mixed Mode will only support airMAX AC radios in Access Point mode. E.g. You will not be able to connect an airMAX AC Station to an airMAX M in Access Point mode.
Table of Contents
1. Access Point Configuration Steps
2. Station Radio Configuration
3. Still having trouble?
4. Related Articles
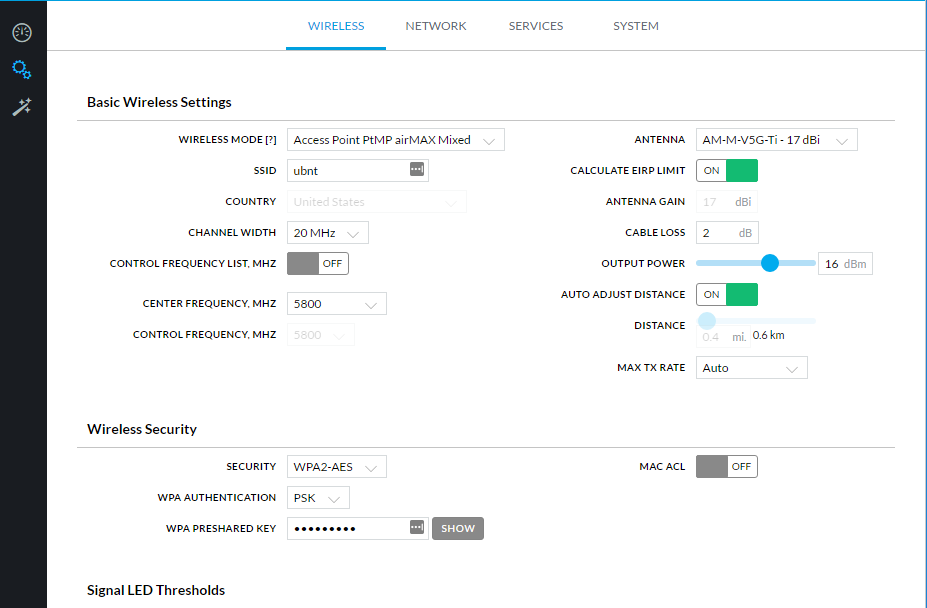
Access Point Configuration (Any airMAX AC radio on airOS 8+)
1. Navigate to the Wireless tab via the Settings Icon > Wireless.
2. Change Wireless mode to "Access Point PtMP Mixed Mode". This is the only wireless mode that will allow airMAX M clients on airOS 6+ to connect.
3. Set the channel width to 20MHz. Note: 10/20/40MHz channel widths are supported in AC Mixed mode operation.
4. If using encryption (recommended) don't forget to note the WPA2-AES pre-shared key.
5. Save changes made on the Wireless tab with the "Save Changes" button at the bottom.
Station Radio Configuration (Any airMAX M radio on airOS 6+)
1. Navigate to the radios web interfaces (https://192.168.1.20 on factory default units).
2. Confirm the radio is on airOS6+ on the Main tab.
3. Navigate to the Wireless tab.
4. Set Wireless mode to "Station" and enable WDS (Transparent Bridge Mode).
5. Confirm channel width matches AP configuration (20MHz in this example or Auto 20/40MHz)
6. If using Wireless Encryption, set "Security" to WPA2-AES/PSK.
7. Set the SSID to match the AP or use the "Select" button to find the Mixed Mode Wireless Network. It should show as airMAX AC under "Radio Mode".
8. Hit the "Change" button to apply the settings and then "Apply" to commit.
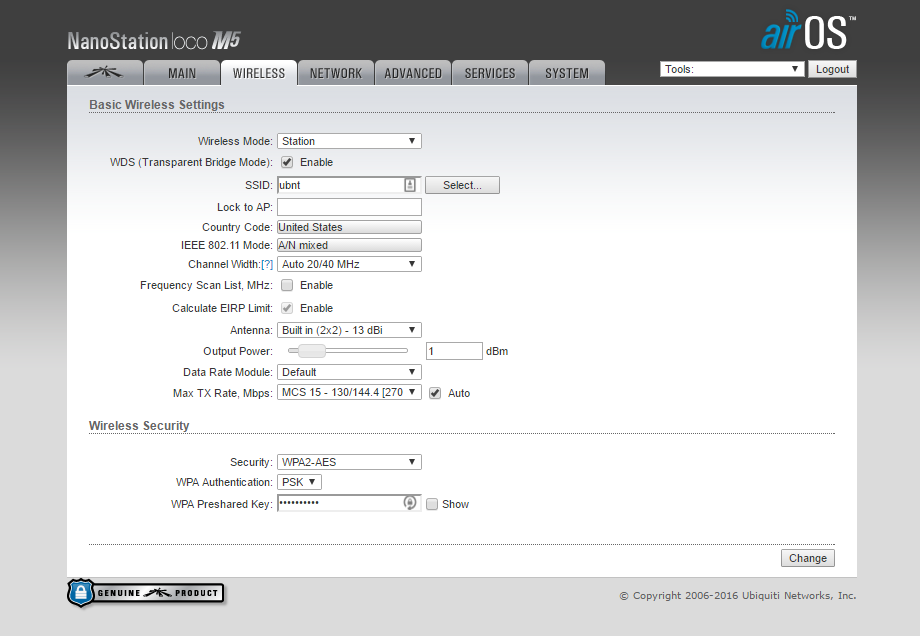
Your Wireless tab should look something like this on the Station.
And once the Station connects (could take 1-2 minutes), it will look like the image below on the AP's Main Tab.
Still having trouble?
Things to check:
- SSID and WPA2-AES values on both radios
- Channel width
- Disable any frequency lists and confirm the Station supports the AP operating frequency.
- Due to the number of channels available in the 5GHz band, it can sometimes take several minutes for a radio to connect. Especially if the AP is using a DFS frequency that requires a wait time before transmitting.
- Confirm radios are on firmware that supports mixed mode operation. airOS 8+ for AC devices and airOS 6+ for M devices.
จบบทความ
Back to XPERT ZONE